In most homes, toilet bowls and tanks are made out of porcelain. This heavy, durable material is designed to hold up against regular use for potentially decades. However, damage can occur over time, and it should be repaired promptly. In the event the damage is severe, however, a toilet replacement is often the better option.
What Causes Toilet Bowls To Fracture?
Porcelain is a durable ceramic material that is produced when a clay-like material is heated to an extraordinarily high temperature.
Small fractures are often associated with sudden and severe temperature changes. However, a toilet in a climate-controlled area can develop a leak because of a manufacturing defect, an impact to the bowl, a poor repair, or simply from being old.
How To Fix a Cracked Toilet Bowl
What does it take to repair a tiny fracture in the toilet? If the fracture is above the waterline, you may choose to watch the fracture rather than repair it immediately. Unless it is a severe crack or could potentially cause a water leak, a watchful approach is always an option. If you determine that the fracture must be repaired, here are the steps for fixing a cracked toilet bowl.
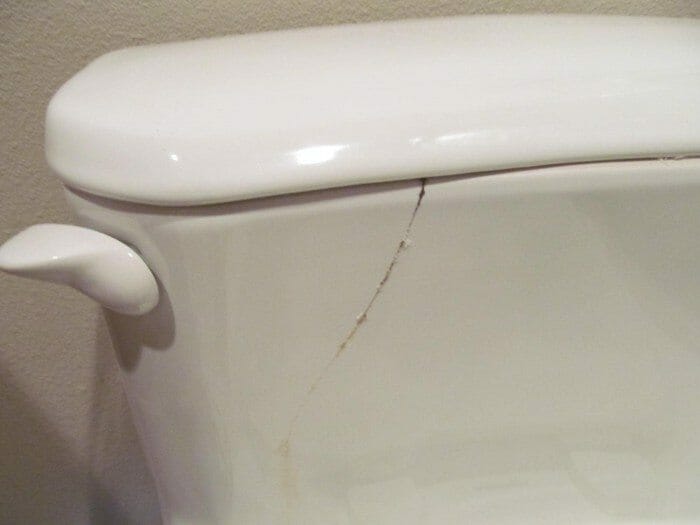
1. Locate the Crack
Some fractures are difficult to spot, and you may only be aware of a leak because of moisture on the outside of the tank or on the floor. In some cases, the water may actually come from a leaking gasket or seal rather than from damage to the tank. Once you have located the crack and assessed the severity of it, you can prepare for a do-it-yourself repair project.
2. Gather the Supplies
A product like Porc-A-Fix Porcelain Touch-Up Repair Glaze or a similar type of waterproof epoxy is necessary. You also need a putty knife, a sponge, a bucket, sandpaper, an old towel, and household cleaning products. The process can take a couple of hours to complete, so it is best to have all of the supplies on hand and ample time available before you begin the work.
3. Drain the Tank and Bowl
Turn off the water supply to the toilet by adjusting the knob mounted to the wall behind the toilet. Flush the toilet a few times so that the water in the tank and bowl are mostly removed. Some water will remain. Use the sponge and bucket to mop up the remaining moisture. Towel-dry the damaged area.
4. Clean and Prepare the Surface
Once the area in question is dry, use sandpaper to scrape away the finish on and around the crack. You should only sand the area where the waterproof epoxy will be applied. Sand the surface until it is rough to the touch. Rinse away the dusty debris and allow the surface to dry.
5. Follow the Manufacturer’s Instructions
Each waterproof epoxy product has unique instructions, so you must read the instructions carefully. Those instructions override the application instructions presented here. Generally, however, the epoxy is sold in two parts: the resin and the catalyst. They must be mixed together to activate the epoxy. When the epoxy is ready, apply it to the prepared area on the toilet using a putty knife. Fill in or cover the crack as much as possible. At the same time, ensure that the surface is as smooth as you can make it. Keep in mind that epoxy typically must be fully applied within 30 minutes or less after it is activated. After it is set, it generally must cure for approximately 24 hours.
6. Inspect Your Work
After the epoxy is cured, turn on the main water supply to the toilet. Water will begin filling the toilet bowl and tank. Look for signs of a leak as the water fills the bowl. Flush the tank and watch for leaks as the bowl refills.
When To Replace the Toilet
If you complete these steps and the toilet is still leaking, a toilet replacement is necessary. A replacement is also required if the toilet is too damaged to even attempt to repair. With many styles and types of toilets to choose from, this is a wonderful opportunity to upgrade the style of your bathroom. A low-flow toilet may reduce water consumption as well.
Fixing a cracked toilet bowl can be a messy project, but it often can be completed by a motivated do-it-yourself-er when the damage is negligible. If you decide to replace the toilet rather than fix the old and damaged one, rely on Toiletsman.com for guidance with the selection of your new toilet.